Jump to content
  • Sign Up
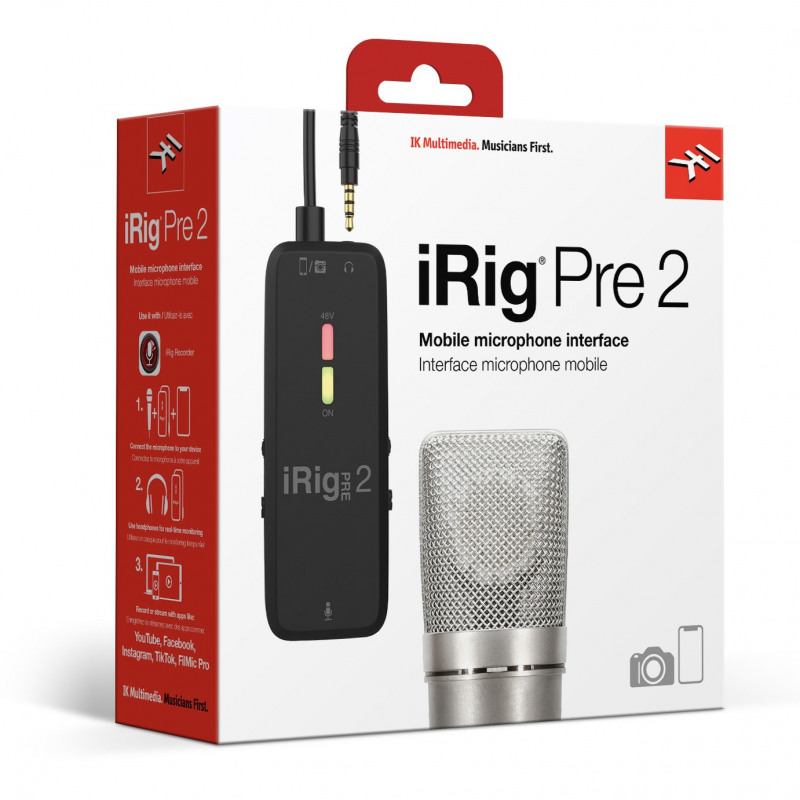
  • In order to connect professional XLR microphones to your Smule device, you need an audio adapter or preamp. If you use a condenser microphone, you even need an adapter supporting phantom power. For many years, the IK Multimedia’s iRig Pre has been a popular choice among Smule singers. It was affordable and easy to use. In the meantime, the successor, the iRig Pre 2 has been released. Here is what is new. 

    The casing now looks similar to the more expensive iRig PRO I/O. But the iRig Pre 2 still uses a traditional analog audio jack. This made perfect sense at the time the original iRig Pre was released, but today you will usually need a lightning or USB adapter to connect the iRig Pre 2 to your phone or tablet. Unfortunately, such adapters are not included and the audio cable of the device cannot be switched out. An improvement is that the device can now automatically switch between a TRS and and TRRS connection. As a result, more devices (including digital cameras) are supported without the need for additional adapter cables. 

    As the original iRig Pre, the iRig Pre 2 features a gain control knob and a headphone jack. The device now uses two AA batteries (instead of one 9V battery as before). You can expect up to 20 hours of use with one set of batteries. But if you turn on phantom power for condenser microphones, only up to 7 hours are possible. 
    If you want to use XLR microphones (especially condenser mics) with Smule, the iRig Pre 2 is one of the most affordable way to make that work. If you already own the older iRig Pre however, there would be no need to upgrade. The improvements mostly relate to better compatibility (e.g. in regards to digital cameras), which are irrelevant for Smule users. 
    The biggest disadvantage remains the fact, that the iRig Pre and iRig Pre 2 can only work with batteries. So for power users we still recommend the iRig PRO I/O, which offers a fully digital connection with better audio quality and allows for a power supply (sold separately). 
    Smule just started a beta phase for a new feature that allows users to save audio-only songs as a video with the lyrics being animated in various styles. The feature is available for new solos and collaborations on the latest iOS version. You just record your audio-only solo or OC as always. On the last screen where you choose whether the song is public and whether you want to invite all your followers, there is a new options to save the song with animations. 

    If you select this option, you can pick from currently 12 different animation styles, as seen in the picture above. Solos and joins using this option will now be saved and played as video. Here is a song with this feature turned on:

     
    What do you think? Do you like this new feature?
    You can also submit feedback to Smule here. 
    In an older article we already talked about creating Smule background tracks without vocals, but  with a focus on apps you would use on a desktop computer. This time, we introduce two recommendable web services as a convenient alternative. 
    Vocal Remover
    The first service, vocalremover.org, can be used completely free (with optional, affordable membership plans for faster and more extractions). The process is pretty straightforward: just upload a song (for example as mp3) and Vocal Remover will try to split the audio into a background track and an ‘a cappella’ track with just the vocals. 

    If you are happy with the result, just choose Save → Music. 
    I have gotten acceptable results using this service, but the quality of the results will always depend on the specific song. It can be perfect for one song and unusable as background track for another. But since it is free, there is no reason not to try it out if one of your favourite songs isn’t available on Smule yet.

    By the way: Don’t you hate it when songs you love contain a few notes which are just too high for you to sing? Well, then give the ‘Pitcher’ feature a try! With it, you can change the key and speed of a song. Don’t overdo it though! The bigger the changes, the more artificial the track will sound, but moving a song one or two half-tones up or down might be give acceptable results. 
    LALAL.AI
    Lalal.ai is an extremely versatile, AI-powered service which lets you extract vocals and even individual instruments from a song. You can try the service for free and get a short preview of your tracks, but to regularly remove vocals from full songs you have buy one of their “packs” covering a certain amount of minutes to convert. But the isolation quality can be worth the price. The results are absolutely stunning and clearly beat the free services and other traditional extraction methods. Just try it out with the free previews. No registration is required. Just upload your favourite songs here. (Partner link)

    We tried out many more services but didn’t find them worth featuring, because the quality of the extraction was lacking or there were too many limitations. The two services featured above stand out because of the quality of Lalal.AI and what is offered for free by vocalremover.org. But if you use a different extraction service which gives you great results, feel free to recommend it in the comment section below. 
    On Smule we can sing with people from all over the world—from the safety of our homes. Like Eva Stultjens, Ilona Dekker (both from the Netherlands) and Julieanne Reel (from Ireland), who sang a lot of group Karaoke songs on Smule. 

    But despite the distance between them, they decided in 2022 to form a band and sing together on stage. They are performing classic songs with intimate acoustic backing and 3-piece harmonies.  
    More information can be found on https://www.moonsistersmusic.com
    If you become a Sing.Salon supporter, you are not only helping us to maintain this community website for Smule users—you also gain more and more benefits: an ad-free use of our website, credits for our download service, and much more. And we just added a new benefit: Sing.Salon supporters can now create a record in our Featured Singers database:
    ☞ https://sing.salon/featured-singers/
    This was previously available as a separate product, but now we simplified it and all Sing.Salon supporters can create an entry in this database without any additional costs. 
    If you create an entry in this database, it will be shown on the Featured Singers page and as part of our banner rotation throughout the website. Entries in this database usually get hundreds of thousands of views. 

    When Sing.Salon users click on your entry, they see a page where you can tell them a little more about yourself and where they can listen to your favourite Smule performance. And of course they can open your Smule profile to follow you on Smule. 
    How to get featured?
    Make sure you are currently a Sing.Salon supporter Go to the Featured Singers page Click on the button “Add new Singer” Fill out the form: Your Smule name (required) in exactly the same spelling as on Smule Something about yourself (optional) Your location (optional) Featured Song (required). The web URL of a Smule solo or collaboration you took part in. You can use the “Copy Link” function in the Smule app or find the song on smule.com. 
    A proper address looks like this (short version):
    https://www.smule.com/c/1263440572_4466390695
    or this (long version):
    https://www.smule.com/recording/join-me-in-death-lyrics-hayjen/1263440572_4466390695 A profile image (required). Preferably in a square format just as on Smule. If you don’t have an image with a square format, make sure you are in the center of the image.   Submit your entry.  We will check your entry within 24 hours and publish it. 
      Notes:
    You can only create an entry for your own personal Smule account, not other Smule users, Smule groups or anything else. You can only add one entry to the database Your entry remains visible as long as you are a Sing.Salon supporter
    After the endless back and forth regarding the profile layout, Smule has finally added a feature that has been requested for years: Playlists. So far, the only way to group your favorite recordings was the Favorites feature. But for many Smule users it wasn’t sufficient. There was no way to create multiple lists or change any privacy options. When you added a song as a favorite, all collaborators were always notified. And many users were even hitting the limit of songs you can mark as favorite, so it became impossible to add more collabs. But now you can finally create and manage multiple playlists with custom privacy options!

    Smule playlists can contain all content types: OCs, solos, duets and group songs. Once you have opened a Smule performance, click the ‘three dots’ menu and select ‘Add to Playlist’. You can either use an existing playlist or create a new one. Your favorites are still there as the default playlist. But now you add many more playlists. So far, the only customization option is the title. You can give your playlist any name that you like. The cover image is taken from the first song and there doesn’t seem to be an option to change the order of the songs in the playlist. 

    Playlists can be private or public and you can switch at any time between the two options. So you can finally add collabs to a playlist that no one else can see but you! Yes!

    Here are a few ideas for playlists:
    Songs grouped by music genre (e.g. musical, hard-rock) Songs grouped by language Songs grouped by type (e.g. all group songs) Songs from a specific group Songs with a specific duet partner Songs grouped by playback occasion (e.g. ‘jogging’, ‘dinner music’) Songs grouped by presentation style (e.g. cosplay) What kind of playlists will you create? Let us know in the comments! 
    If you download your favorite Smule audio performances, you can give them any filename you want. But you probably have noticed that the appearance of your downloads in a media player app is far from ideal. There is no proper song title, no artist’s name, and no cover image. So, in this article I explain how you can manually add this kind of data on Windows and Mac OS without any additional software. 
    Adding meta tags to Smule audio songs on Mac OS
    On Mac OS, almost anyone already uses the Music app (previously called iTunes) to manage their music. And luckily, the Music app allows us to easily add music meta tags and images to songs in our library. And by the way: This data will also be used if you sync your library with your iPhone or iPad. So if you go through the Music app, the appearance of your songs on your mobile device will also improve. 
    After you downloaded a song from Smule, for example using the Sing.Salon Downloader, open the Music app and drag the m4a audio file on the app logo. If the Music app is set up as default playback app, a double-click on the audio file will do the same. This is how the song will likely look:

    This is of course far from ideal. So let’s fix it! Click on the three dots and choose “Get Info” or (depending on your language) press command + I on your keyboard. Now fill in the necessary information. 
    Replace the title “ver:1” with the actual song title. Add the information about the artists. You could add the original artists and/or the ones who took part in the Smule performance. This will allow you to easily find songs with certain Smule artists in the future.  You should also always add an “Album” name. You could add a name like “Smule”, so all your Smule performances are accessible as one album, but of course you can create other albums as well, e.g. something like “Favorite Smule Christmas Songs”. 
    Much better already! Now let’s also add a cover image! Click on the Artwork tab. Make sure you have a square image ready to represent the song. This could be the original artwork for the single/album or the cover image that appears on Smule. Just drag that image from the Finder onto the Music app Artwork tab. If the image you want to use is on a website, you can also directly drag the image from the browser window over to the Music app. 
    If you download the songs through Sing.Salon, we show you the Smule cover image on our website for seven days. You can drag the image from there onto the Music app. Alternatively, you can use a web service like this one. Paste the URL of your Smule performance in the input field and the click “Get Open Graph status”. The website will then show you the Smule cover image, so you can easily download it or drag it onto Music app. 
    And now our Smule audio song appears like that:

    Adding meta tags to Smule audio songs on Windows (10+)
    If you haven’t already, move your downloaded audio file(s) into the music directory of your account. Open the Groove Music app or just double-click the Smule audio song if Groove Music is set up as your default audio player. Your screen should now look similar to this:

    The Smule song appears as part of an “unknown album” by an “unknown artist”. Let’s fix that! Make a right-click on the song and choose “Edit Info” as shown here:

    A dialog window will pop up and you can add various information about the song. 

    Replace the title “ver:1” with the actual song title. Add the information about the artists. You could add the original artists and/or the ones who took part in the Smule performance. This will allow you to easily find songs with certain Smule artists in the future.  You should also always add an “Album” name. You could add a name like “Smule”, so all your Smule performances are accessible as one album, but of course you can create other albums as well, e.g. something like “Favorite Smule Christmas Songs”.  Your song should now look like this:

    The last step is to add a cover image. Make sure you have a square image ready to represent the song. This could be the original artwork for the single/album or the cover image that appears on Smule. Save that square picture somewhere on your computer where you can easily find it. Now click on the pencil that appears over the empty cover image and select the cover image from your computer. 
    If you download the songs through Sing.Salon, we show you the Smule cover image on our website for seven days. You can save the cover image from there to your computer. Alternatively, you can use a web service like this one. Paste the URL of your Smule performance in the input field and the click “Get Open Graph status”. The website will then show you the Smule cover image and you can save it to your computer from there. 

    That’s it! Now your Smule audio songs will appear properly with title and cover image on Windows! And not just in the Groove app! The information is saved within the audio file and will also be shown in the Windows Explorer and other apps.Â